DBCC OPENTRAN
-Find longest running transaction and identify the SPID
DBCC INPUTBUFFER(SPID)
-Shows the query being processed so you can assess whether it is safe to kill
sp_who2
-More info about SPID
DBCC SQLPERF ( LOGSPACE )
-Shows log size and Log Space used
sp_helpfile
-Shows log and database file locations, growth and size.
Thursday, 6 December 2012
Saturday, 17 March 2012
Resetting HP iLO IP address and password
I found myself in the interesting situation where a motherboard had been replaced in an HP Blade BL460 and I then I needed to load the iLO to rebuild the server; however I did not know the IP address of the iLO or the username/password and I could not connect to the iLO via the HP System Management Page...
I did not have a monitor or blade adaptor cable to hand to boot into the iLO BIOS, so I checked the DHCP server for the entry with the longest lease expiration, which should be the newest lease, but there was nothing there which looked like an iLO.
I then found the command to show all iLO IP address from the OA CLI, so I SSH'd onto the OA using PuTTY and ran the following command:
show ebipa

I then found two different ways to reset the IP address and password - both using the HPONCFG tool installed with the SmartStart CD. If you dont have this installed you can download the ProLiant Support Pack from the HP downloads section, specific to your server and OS. The easiest way is via the GUI, but if you wanted to change multiple iLo usernames/passwords and network configuration, then the command line might be useful.
1) HPONCFG - GUI
To run this tool, logon to the server in question, it does not have to be a console session, just a normal RDP session and run the executable below:
C:\Program Files\HP\hponcfg\hponcfg_gui.exe
You will then see a summary of your iLO.

Click on Network - Standard Network Settings and you will see the below, where you can set the iLO to a static address or DHCP as you prefer.


Now you will be able to log onto the iLO with your newly set IP and user credentials.
2) HPONCFG - Command Line
Again, ensure HPONCFG is installed via the SmartStart CD or the ProLiant support pack. Load a command prompt and navigate to:
C:\Program Files\HP\hponcfg\
To reset the password of the active account (assuming the username is Administrator) create the following XML in the C:\Program Files\HP\hponcfg\ folder:
<ribcl VERSION="2.0">
<login USER_LOGIN="Administrator" PASSWORD="password">
<user_INFO MODE="write">
<mod_USER USER_LOGIN="Administrator">
<password value="NewPassword"/>
</mod_USER>
</user_INFO>
</login>
</ribcl>
NOTE - The second line must be present for the XML to parse, it does not matter what username/password you enter. The blue highlighted line above is where the new password is set.
You would then run the following command to commit the XML to the iLO:
C:\Program Files\HP\hponcfg\hponcfg.exe /f ScriptName.xml
You can also add a user, rather then touching the existing user, using the following XML:
<ribcl version="2.0">
<login USER_LOGIN="Administrator" PASSWORD="password">
<user_INFO MODE="write" >
<add_USER
USER_NAME="NewAdmin1"
USER_LOGIN="NewAdmin1"
PASSWORD="NewPassword">
<reset_SERVER_PRIV value = "Y" />
<admin_PRIV value = "Y" />
<REMOTE_CONS_PRIV value="Y" />
<RESET_SERVER_PRIV value="Y" />
<VIRTUAL_MEDIA_PRIV value="Y" />
<CONFIG_ILO_PRIV value="Y" />
</add_USER>
</user_INFO>
</login>
</ribcl>
Then again, run the below to commit the XML:
C:\Program Files\HP\hponcfg\hponcfg.exe /f ScriptName.xml
NOTE - the permissions of the account are granted using the highlighted lines above.
To set network configuration use the XML below:
<RIBCL VERSION="2.0">
<LOGIN USER_LOGIN="user" PASSWORD="password">
<RIB_INFO MODE="WRITE" >
<MOD_NETWORK_SETTINGS>
<IP_ADDRESS VALUE = "x.x.x.x"/>
<SUBNET_MASK VALUE = "x.x.x.x"/>
<GATEWAY_IP_ADDRESS VALUE = "x.x.x.x"/>
<PRIM_DNS_SERVER value = "x.x.x.x"/>
<DHCP_ENABLE VALUE = "N"/>
</MOD_NETWORK_SETTINGS>
</RIB_INFO>
</LOGIN>
</RIBCL>
NOTE - The second line must be present for the XML to parse, it does not matter what username/password you enter.
You can also extract the current iLO config to a .xml file, modify and re-upload using the command below:
C:\Program Files\HP\hponcfg>hponcfg /w iLO-Export.xml
More info on the command line can be found below:
HP iLO User Guide
I did not have a monitor or blade adaptor cable to hand to boot into the iLO BIOS, so I checked the DHCP server for the entry with the longest lease expiration, which should be the newest lease, but there was nothing there which looked like an iLO.
I then found the command to show all iLO IP address from the OA CLI, so I SSH'd onto the OA using PuTTY and ran the following command:
show ebipa

This then goes on to list all the iLO IP address/Subnet Mask, Default Gateway and DNS settings, and the specific iLO on the swapped out motherboard was set statically to 0.0.0.0, so I now knew why I couldn't see the iLO on the DHCP scope. I then found two different ways to reset the IP address and password - both using the HPONCFG tool installed with the SmartStart CD. If you dont have this installed you can download the ProLiant Support Pack from the HP downloads section, specific to your server and OS. The easiest way is via the GUI, but if you wanted to change multiple iLo usernames/passwords and network configuration, then the command line might be useful.
1) HPONCFG - GUI
To run this tool, logon to the server in question, it does not have to be a console session, just a normal RDP session and run the executable below:
C:\Program Files\HP\hponcfg\hponcfg_gui.exe
You will then see a summary of your iLO.

Click on Network - Standard Network Settings and you will see the below, where you can set the iLO to a static address or DHCP as you prefer.

You can then click on User, where you will see the below. Here you can reset the password of the existing account, or add another one.

Now you will be able to log onto the iLO with your newly set IP and user credentials.
2) HPONCFG - Command Line
Again, ensure HPONCFG is installed via the SmartStart CD or the ProLiant support pack. Load a command prompt and navigate to:
C:\Program Files\HP\hponcfg\
To reset the password of the active account (assuming the username is Administrator) create the following XML in the C:\Program Files\HP\hponcfg\ folder:
<ribcl VERSION="2.0">
<login USER_LOGIN="Administrator" PASSWORD="password">
<user_INFO MODE="write">
<mod_USER USER_LOGIN="Administrator">
<password value="NewPassword"/>
</mod_USER>
</user_INFO>
</login>
</ribcl>
NOTE - The second line must be present for the XML to parse, it does not matter what username/password you enter. The blue highlighted line above is where the new password is set.
You would then run the following command to commit the XML to the iLO:
C:\Program Files\HP\hponcfg\hponcfg.exe /f ScriptName.xml
You can also add a user, rather then touching the existing user, using the following XML:
<ribcl version="2.0">
<login USER_LOGIN="Administrator" PASSWORD="password">
<user_INFO MODE="write" >
<add_USER
USER_NAME="NewAdmin1"
USER_LOGIN="NewAdmin1"
PASSWORD="NewPassword">
<reset_SERVER_PRIV value = "Y" />
<admin_PRIV value = "Y" />
<REMOTE_CONS_PRIV value="Y" />
<RESET_SERVER_PRIV value="Y" />
<VIRTUAL_MEDIA_PRIV value="Y" />
<CONFIG_ILO_PRIV value="Y" />
</add_USER>
</user_INFO>
</login>
</ribcl>
Then again, run the below to commit the XML:
C:\Program Files\HP\hponcfg\hponcfg.exe /f ScriptName.xml
NOTE - the permissions of the account are granted using the highlighted lines above.
To set network configuration use the XML below:
<RIBCL VERSION="2.0">
<LOGIN USER_LOGIN="user" PASSWORD="password">
<RIB_INFO MODE="WRITE" >
<MOD_NETWORK_SETTINGS>
<IP_ADDRESS VALUE = "x.x.x.x"/>
<SUBNET_MASK VALUE = "x.x.x.x"/>
<GATEWAY_IP_ADDRESS VALUE = "x.x.x.x"/>
<PRIM_DNS_SERVER value = "x.x.x.x"/>
<DHCP_ENABLE VALUE = "N"/>
</MOD_NETWORK_SETTINGS>
</RIB_INFO>
</LOGIN>
</RIBCL>
NOTE - The second line must be present for the XML to parse, it does not matter what username/password you enter.
You can also extract the current iLO config to a .xml file, modify and re-upload using the command below:
C:\Program Files\HP\hponcfg>hponcfg /w iLO-Export.xml
More info on the command line can be found below:
HP iLO User Guide
Wednesday, 7 March 2012
SCOM Web Application Monitoring - The URL probe returned error code -2147012894 Reason 0x80072ee2
The URL probe returned error code -2147012894. Reason: 0x80072ee2
I am new to SCOM 2007 R2 Web Application Monitoring, and there seems to be a surprisingly small amount of information out there for some of the errors that I started to get when testing out the functionality.
I have not completed my testing, but this blog details my findings of how to get past the cryptic error above.
My RMS does not have direct Internet access. All Internet access needs to travel out via a proxy and the users need to be a member of a specific group to do so.
So my play was to setup an application monitor and then configure a proxy for the test. I setup a new web application monitor and tried to run the test function, and received an error code -2147012894 with a reason of 0x80072ee2.

I click on details and get the same information. Helpful.

After some general investigation into proxies and SCOM web application, it appears that SCOM cannot pull proxy information from your IE browser, as a lot of applications do, it needs to be configured using netsh if you are running Server 2008 (R2), or proxycfg if you are running Server 2003. I am running Server 2008 R2 so in this case I ran:
netsh winhttp set proxy x.x.x.x:port

I then re-ran the test and this time, no -2147012894 error! I now get an http error 407 (proxy authentication error), this is the next step I need to figure out, how/where to configure the proxy authentication account.
Hopefully this will help someone who has been equally stumped with the cryptic -2147012894 error.
SCOM 2007 R2 Web console - You do not have have permission to view this directory or page
When loading the SCOM Web console you receive:
"You do not have have permission to view this directory or page"


I came across this issue when testing using the SCOM web console from another server. I was required to enter my credentials, and when I entered my domain admin account (also an OpsMgr admin), my credentials were rejected until the "You do not have permission to view this directory or page" message appeared.
It seems the issue is with the order of the authentication providors, set in the IIS console. The environment used is Server 2008 R2 and IIS 7. If you load up the IIS manager and open the Operations Manager 2007 site, then select Authentication, you should see "Windows Authentication".

Select windows authentication and on the right hand side, click providors, then you should see the window below:

As per the above, move NTLM above Negotiate, and click OK.
Run an IISreset.

You should now find that the SCOM web console works without issue. It would seem that the site can only authenticate with NTLM authentication.
Wednesday, 29 February 2012
Cannot start IMA service PS4
After a reboot of one of our Citrix servers in a PS4 farm, the OS booted up fine, but the IMA service did not start, and would not start if you tried to start it manually.
We received the errors below in the system log:
Event ID 3389
The Citrix Presentation Server failed to connect to the Data Store. ODBC error while connecting to the database: S1000 -> [Microsoft][ODBC Microsoft Access Driver] The Microsoft Jet database engine stopped the process because you and another user are attempting to change the same data at the same time.
Event ID 3609
Failed to load plugin ImaPsSs.dll with error IMA_RESULT_FAILURE
Event ID 3609
Failed to load plugin ImaRuntimeSS.dll with error IMA_RESULT_FAILURE
Event ID 3601
Failed to load initial plugins with error IMA_RESULT_FAILURE
Event ID 7024
The Independent Management Architecture service terminated with service-specific error 2147483649 (0x80000001).
After researching the error I found that this was a corruption in the Local Host Cache database. The Local Host Cache Database allows a farm server to function in the event the datastore is unreachable and it improves performance by caching information from the ICA clients. More info below:
http://support.citrix.com/article/CTX759510
The database itself is stored in the location below:
%ProgramFiles%\Citrix\Independent Management Architecture\imalhc.mdb
To fix this issue and start the IMA service you need to ensure that the datastore server is up, and then you can recreate the database using the command below:
dsmaint recreatelhc

This will rename the existing .mdb file, create a new database and sets the registry key below to force the server to communicate with the datastore once the IMA service is restarted, in order to repopulate the LHC database:
HKEY_LOCAL_MACHINE\SOFTWARE\Citrix\IMA\Runtime\PSRequired
value = 1
The IMA service should then start up cleanly.
We received the errors below in the system log:
Event ID 3389
The Citrix Presentation Server failed to connect to the Data Store. ODBC error while connecting to the database: S1000 -> [Microsoft][ODBC Microsoft Access Driver] The Microsoft Jet database engine stopped the process because you and another user are attempting to change the same data at the same time.
Event ID 3609
Failed to load plugin ImaPsSs.dll with error IMA_RESULT_FAILURE
Event ID 3609
Failed to load plugin ImaRuntimeSS.dll with error IMA_RESULT_FAILURE
Event ID 3601
Failed to load initial plugins with error IMA_RESULT_FAILURE
Event ID 7024
The Independent Management Architecture service terminated with service-specific error 2147483649 (0x80000001).
After researching the error I found that this was a corruption in the Local Host Cache database. The Local Host Cache Database allows a farm server to function in the event the datastore is unreachable and it improves performance by caching information from the ICA clients. More info below:
http://support.citrix.com/article/CTX759510
The database itself is stored in the location below:
%ProgramFiles%\Citrix\Independent Management Architecture\imalhc.mdb
To fix this issue and start the IMA service you need to ensure that the datastore server is up, and then you can recreate the database using the command below:
dsmaint recreatelhc
This will rename the existing .mdb file, create a new database and sets the registry key below to force the server to communicate with the datastore once the IMA service is restarted, in order to repopulate the LHC database:
HKEY_LOCAL_MACHINE\SOFTWARE\Citrix\IMA\Runtime\PSRequired
value = 1
The IMA service should then start up cleanly.
Tuesday, 28 February 2012
Certificate errors on terminal servers/Missing certificates
This was a particularly annoying problem which we were having on a Server 2008 R2/Xen App 6.5 environment, but I don't think this would be limited to Server 2008 R2 or Citrix.
Basically users were frequently getting non trusted certificate errors on some fairly mainstream websites which when tested on a desktop PC or server out of the Citrix environment, worked fine.
When you loaded the trusted root certificate authority, either via Internet explorer, or via MMC/local machine certificates, there were less trusted root certificates present when compared to the desktop PC, or another server, out of the Citrix farm. The Citrix servers were fully patched using windows update.
After investigating the way Internet trusted root certificate authorities work, I discovered that the normal process is that when an HTTPS site loads which is trusted by a certificate not in the trusted root certificate store, it will look to windows update to see if the root certificate is on Microsoft's trusted root certificate list, and if it is, it will auto-import it directly, not via a WSUS/Windows Update installation.
I then researched the group policy option which enables/disables Auto Root Certificate Update, and found this to be located in:
Computer Configuration\Adminisrative Templates\System\Internet Communication Management\Internet Communication Settings
The setting is called - Turn Off Automatic Root Certificate Update.

I ran a group policy results wizard for a standard user account to track down the GPO which was feeding this setting and found it to be enabled.
Once I disabled the setting, and ran a gpupdate /force on the servers, I opened the computer certificate MMC and opened up the Trusted Root Certificate store, noted down the number of certificates and browsed to the previously problematic sites. This time round they loaded up fine, and I noticed an extra certificate had been loaded into the Trusted Root Certificate Store.
Problem Solved.
Monday, 27 February 2012
HP Blade BL465 Wont Power On using iLO
I found myself doing an out of hours reboot of a
Windows Server 2008 R2 server which would not shut down via the OS. The server is an HP Blade BL465c G7 in a c7000 enclosure. So I performed
a cold boot via the HP iLO menu as I normally would. I then started to worry
when I saw the orange indicator light on the blade enclosure rather than the
normal powered on green light and no errors in the IML log.
I went into the Remote Console, the
Integrated Remote Console and the power options menu in the Onboard Administrator and clicked "momentary press" which would
normally power on the server. None of them worked - the light was still orange....
I then did some research and found that if you SSH
onto the Onboard Administrator, you can perform a reset command, which effectively
removes and reseats the blade. You can do this using PuTTY or any other SSH
client.
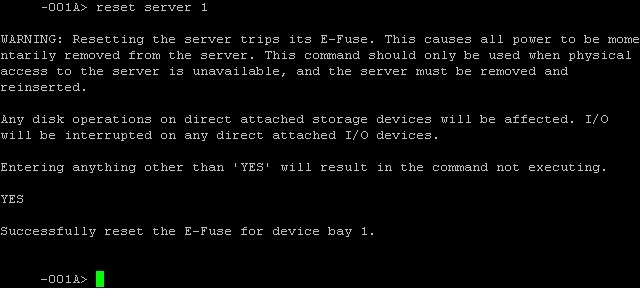
Once you SSH onto the client, type in the normal
username/password you use in the GUI to authenticate, make sure you identify the server
correctly by the number which appears to the left of the server name in the
device bay, then type:
reset server X (where X is the server number).
Read the warning
Type YES and push enter

The blade will disappear from the chassis, like it
would if you removed the blade physically, and after about 20-30 seconds it
reappears and it is already powered up.
Saved a night time drive into work :)
Subscribe to:
Posts (Atom)